텐서보드를 통해서 텐서의 그래프와 학습되는 과정을
시각화해서 볼 수 있다.
텐서보드는 다음과 같은 방법으로 구현할 수 있다.
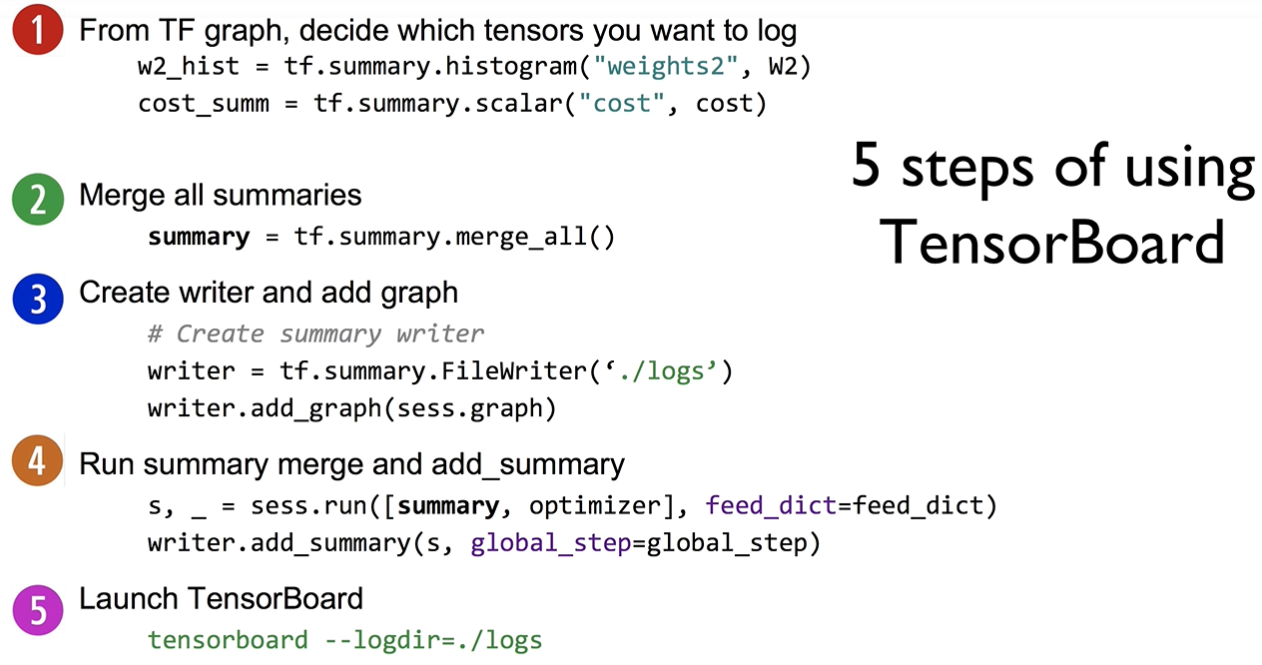
Step 1
어떤 텐서를 로깅할 지 히스토그램으로 정의한다.
파이썬 코드는 다음과 같다.
with tf.name_scope("Layer1"):
    W1 = tf.Variable(tf.random_normal([2, 2]), name="weight_1")
    b1 = tf.Variable(tf.random_normal([2]), name="bias_1")
    layer1 = tf.sigmoid(tf.matmul(X, W1) + b1)

    tf.summary.histogram("W1", W1)
    tf.summary.histogram("b1", b1)
    tf.summary.histogram("Layer1", layer1)
name_scope는 일종의 그룹화 개념으로 텐서보드에서 텐서들을 표현할 때
그룹으로 표현해줄 시 시각화 표현에 이해를 도울 수 있다.
위에선 하나의 레이어에 대해서 그룹화를 한 코드이다.
마찬가지로, summry.histogram을 통해서 로깅할 텐서를 지정한다.
Step 2
summary를 통합시킨다. 앞서 정의한 summary에 대해서 통합을 시킨다.
파이썬 코드는 다음과 같다.
# Launch graph
with tf.Session() as sess:
    # tensorboard --logdir=./logs/xor_logs
    merged_summary = tf.summary.merge_all()
Step 3
쓰기 작업을 진행하며 어디에 쓸지 정하고 그래프를 추가할 지 정할 수 있다.
파이썬 코드는 다음과 같다.
# Launch graph
with tf.Session() as sess:
    # tensorboard --logdir=./logs/xor_logs
    merged_summary = tf.summary.merge_all()
    writer = tf.summary.FileWriter("./logs/xor_logs_r0_01")
    writer.add_graph(sess.graph)  # Show the graph
Step 4
Summary 실행 및 실행된 결과에 대해서 기록하기(add_summary) 작업을 수행한다.
파이썬 코드는 다음과 같다.
# Launch graph
with tf.Session() as sess:
    # tensorboard --logdir=./logs/xor_logs
    merged_summary = tf.summary.merge_all()
    writer = tf.summary.FileWriter("./logs/xor_logs_r0_01")
    writer.add_graph(sess.graph)  # Show the graph

    # Initialize TensorFlow variables
    sess.run(tf.global_variables_initializer())

    for step in range(10001):
        _, summary, cost_val = sess.run(
            [train, merged_summary, cost], feed_dict={X: x_data, Y: y_data}
        )
        writer.add_summary(summary, global_step=step)
Step 5
생성한 파일을 지정하여 텐서 보드를 시작 할 수 있다.
명령어는 다음과 같다.
tensorboard -logdir=[로깅 파일을 쓴 위치]
Scalar tensors
실시간으로 변화하는 수치에 대해서 그래프로 보고자 할 경우 Scalar tensors를 사용한다.
파이썬 코드는 다음과 같다.
# cost/loss function
with tf.name_scope("Cost"):
    cost = -tf.reduce_mean(Y * tf.log(hypothesis) + (1 - Y) * tf.log(1 - hypothesis))
    tf.summary.scalar("Cost", cost)

with tf.name_scope("Train"):
    train = tf.train.AdamOptimizer(learning_rate=0.01).minimize(cost)

# Accuracy computation
# True if hypothesis>0.5 else False
predicted = tf.cast(hypothesis > 0.5, dtype=tf.float32)
accuracy = tf.reduce_mean(tf.cast(tf.equal(predicted, Y), dtype=tf.float32))
tf.summary.scalar("accuracy", accuracy)
다중 실행 결과 불러오기
저장할 로깅 파일이름을 다르게 하면서 테스트하면 비교에 수월하다.

'[프로그래밍] > 모두를 위한 딥러닝' 카테고리의 다른 글
| [모두를위한딥러닝] Weight 초기화를 잘해보자 (0) | 2019.08.21 |
|---|---|
| [모두를위한딥러닝] ReLU? (0) | 2019.08.21 |
| [모두를위한딥러닝] XOR 문제를 딥러닝으로 풀기 (0) | 2019.08.21 |
| [모두를위한딥러닝] 텐서(Tensor) 연산 기본 사용 명령어 (0) | 2019.08.20 |
| [모두를 위한 딥러닝] 로지스틱 cost 선형회귀 cost? (0) | 2019.08.20 |


